 Glowproof
How to take the same selfie every day, step by step
To take the same selfie every day, pick one spot facing a window, hold the phone at the same distance and eye level, use a neutral expression with hair pulled back, line up eyes and chin with a fixed guide, and skip the flash. Retake once if the first shot is off.
Coming soon to iPhone
Why does the same selfie matter?
If you want to see change, everything else in the photo must stay still. A small tilt, a nearer phone or a different lamp can alter how a face looks more than a month of skincare. Consistency does not make photos perfect. It makes them comparable, which is what a progress diary needs.
The Wikipedia article on a selfie describes it as a self-portrait taken with a camera held at arm's length. That convention is helpful: arm's length is a natural, repeatable distance for most people.
Step 1: Choose one spot
Pick a place in your home with steady light, such as facing a window or a fixed lamp. Mark it mentally with a feature, such as the corner of a bookshelf behind you. A plain background keeps the eye on your face. Use the same spot every day so that the light and background do not change.
Step 2: Fix the distance
Arm's length works, but arms vary with posture. Rest your elbow against your side or lean on a table to keep the distance steady. For more precision, use a phone stand at a marked distance. The Wikipedia article on perspective distortion explains why distance changes how a face looks: the relative distance at which an image is captured changes its apparent proportions. So choose a distance and keep it.
Step 3: Set the angle
Hold the camera at eye level, pointing straight at you. Tilting it up or down changes the shape of the chin and the nose. Keep your head level, with your chin neither raised nor tucked. A mirror helps you learn the position. Once you find it, check it with the guide on the camera screen each day.
Step 4: Use a neutral pose
Relax your face, close your mouth gently and look at the lens. Smiles and raised eyebrows change the skin around the eyes and cheeks. Pull hair back from the face and take off glasses. If you wear makeup, decide whether to take photos without it and keep to that choice. A bare face is the easiest to compare.
Step 5: Skip the flash and filters
Flash flattens and brightens the face. Beauty modes smooth skin. Both make photos hard to compare. Use the standard camera with normal settings. If your phone offers a mirrored preview, keep it on or off consistently.
Step 6: Take it at the same time
Skin looks different in the morning, after exercise and at night. Pick a moment, such as right after your morning routine, and do it then. If your schedule moves, note the time in your diary.
Step 7: Check and retake once
Look at the photo. Is your face centered? Is the light even? One retake is fine; three retakes turn it into a chore. If the shot is off, keep it anyway and note why. A slightly imperfect photo that exists is better than a perfect one you skipped.
What about a rushed day?
Take the photo anyway, from the same spot, even if the light is flat. Write one word about the day. A rushed photo with a note is still data. The streak of days is part of the value.
How does Glowproof help?
Glowproof, an iPhone skin photo diary in development, guides this routine. The camera screen shows a face oval and a faint outline of your Day 1 photo so that you can line up your eyes and chin in the same position. After the shot, a light check compares brightness, left and right balance and warmth with Day 1, and advises you in a short sentence. It only advises, so you can keep any photo. In Me, Photo settings you can turn the Day 1 outline and grid lines on or off. See Glow Check.
The oval is a static overlay. Glowproof does not detect your face, so lining up is up to you.
How do you handle glasses, hair and makeup?
Decide the rules once. Glasses off, hair back, same makeup state, whether bare or lightly done. If you sometimes wear makeup and sometimes not, tag the photo so that you can sort later. Headbands and clips are useful because they hold hair in the same shape every day. Jewelry and collars at the edge of the frame matter little, but a hat or a hood changes the light on the forehead, so leave them off.
What if your phone has several lenses?
Stick to the standard front camera at its default zoom. Switching between lenses or zoom levels changes the field of view and the apparent shape of the face. If your phone offers a wider front camera mode, avoid it for the diary. Check once, and then forget about it. A steady, ordinary setting is what you want.
How do you keep going for months?
Put the photo at the end of an existing habit, such as the last step of the morning routine. Keep it to a minute. Set a reminder at the time you plan to do it, and remove reminders you ignore. Allow missed days without comment. Photos are cheap to take and easy to skip, and a diary with gaps is still useful.
How do you review the photos?
Once a week or a month, look at a few in a row. Do not flip between two photos obsessively. Look at the dates and the notes. If the light varies a lot, say so. The review matters more than the individual photo, and a calm look at several images beats a close look at one.
Why does a chair or a stand help?
Posture drifts when you stand. Sitting on the same chair at the same table with your elbow supported brings your head to the same height each day. A cheap phone stand or a stack of books at a marked spot removes arm fatigue and shake. These small supports are boring and work, which is the whole point of a routine.
Frequently asked questions
How do I take the same selfie every day?
Use one spot, the same distance, eye-level angle, neutral pose, no flash and the same time of day.
What is the best distance for a progress selfie?
Arm's length with your elbow supported works for many people. A phone stand at a marked distance is more exact.
Should I smile in progress photos?
A neutral expression is easier to compare, because smiles change the skin around the eyes and cheeks.
Should I use the front or back camera?
Most people use the front camera for the guide on screen. Use the same one every day.
Does Glowproof line up my face for me?
No. It shows an oval and a Day 1 outline, and you line up your eyes and chin yourself.
Keep exploring
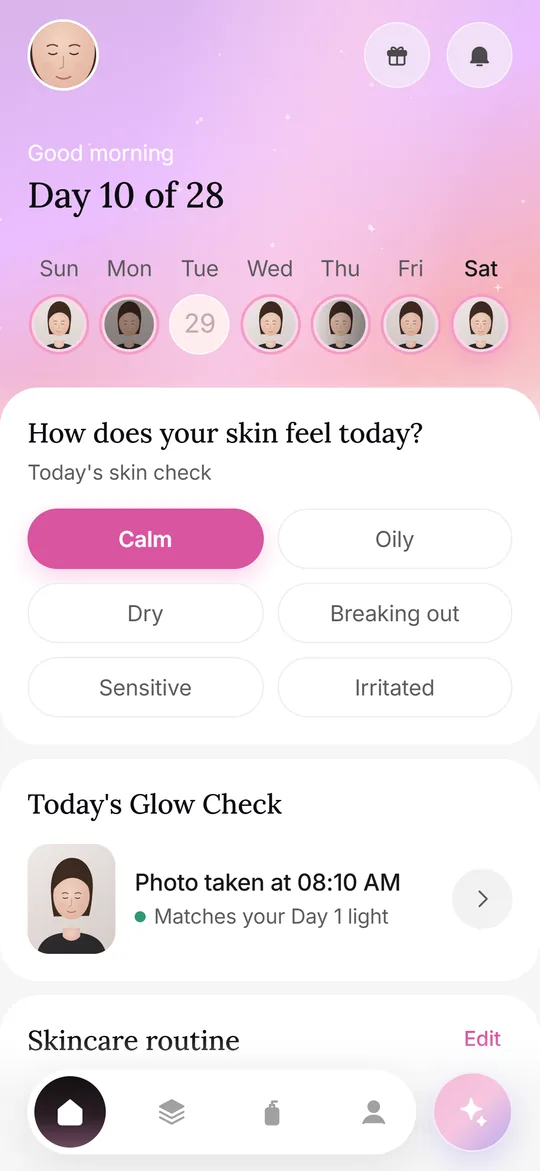 Photos at homeA repeatable home setup: spot, light, distance, angle, timing and a Day 1 reference.
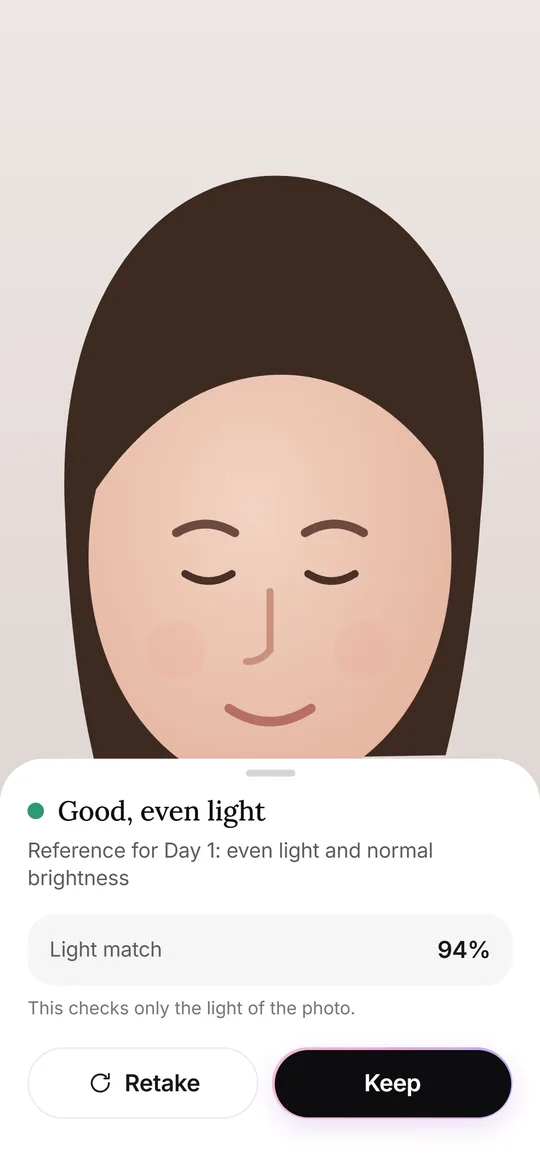 Glow CheckThe daily photo: guide, light check, your feel, tags and notes.Why Do I Look Different in Photos Than in the Mirror?Four reasons a photo of you looks different from the mirror, and what to keep constant so photos compare fairly.